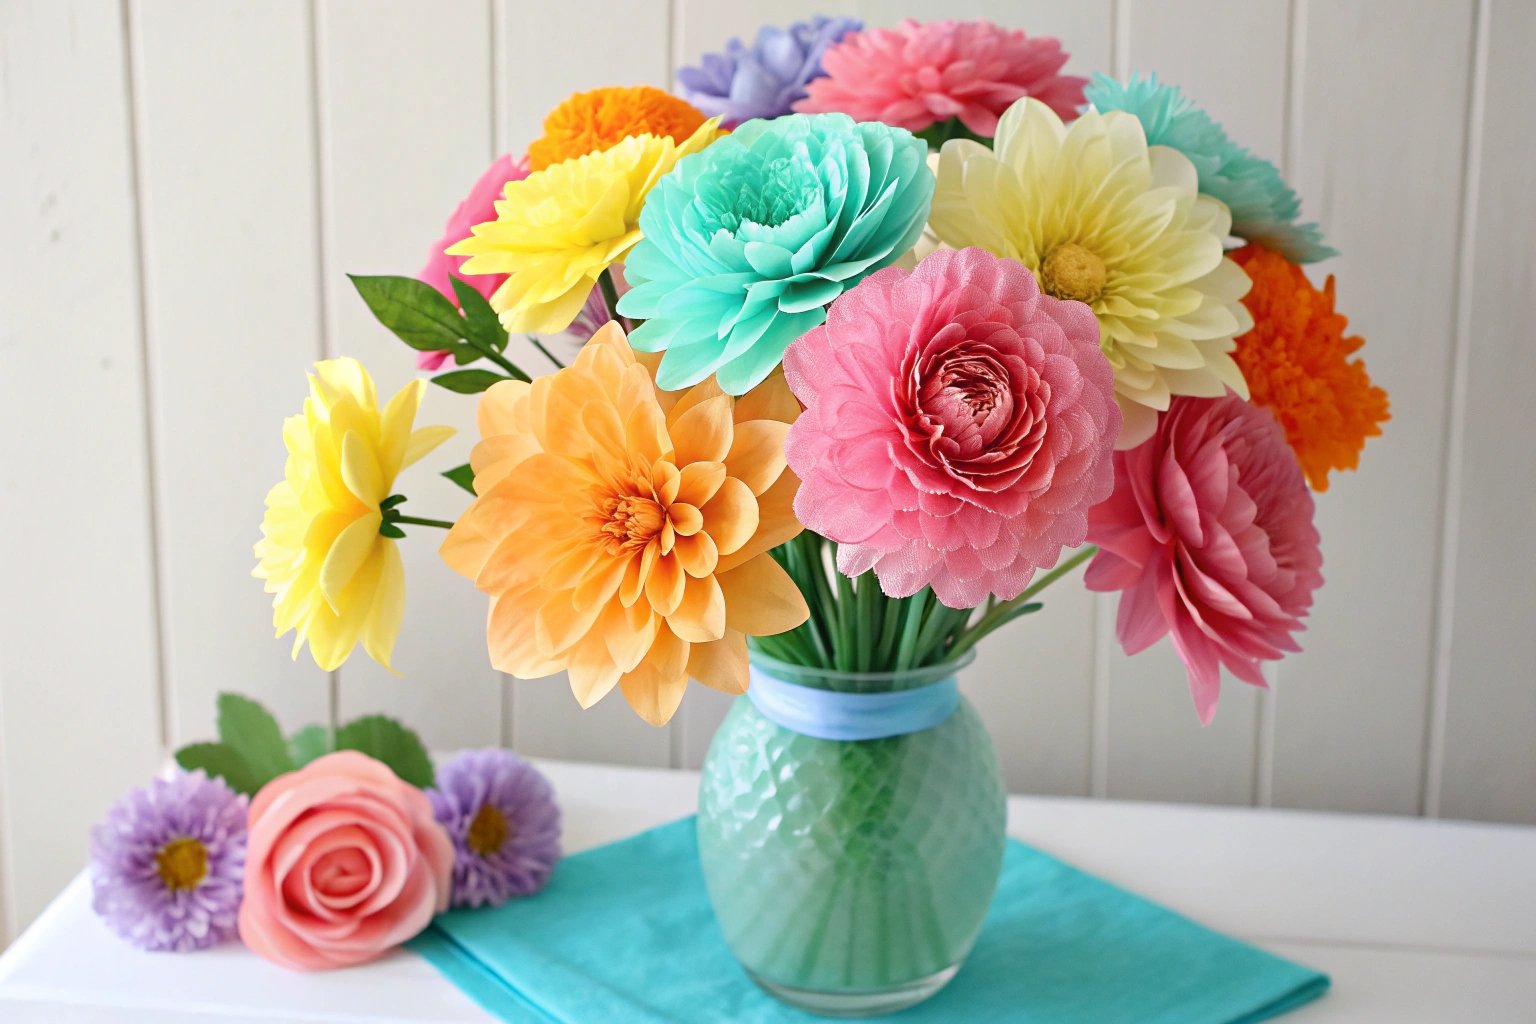
Want lovely flowers that never fade? Tired of expensive bouquets that wilt too soon? Tissue paper flowers are a fun, affordable craft anyone can do.
To make a tissue paper flower bouquet, you'll craft individual flowers by folding and cutting layers of tissue paper. Secure each flower with wire stems. Then, simply gather the finished paper flowers and arrange them into your desired bouquet shape.
It sounds simple, and it really can be! Creating something beautiful with your own hands is very satisfying. Let's break down exactly what you need and the steps to create your own beautiful, lasting bouquet. I'll guide you through the process, drawing on my experience with floral supplies here at The Floral Wrap.
What materials do I need to start making paper flowers?
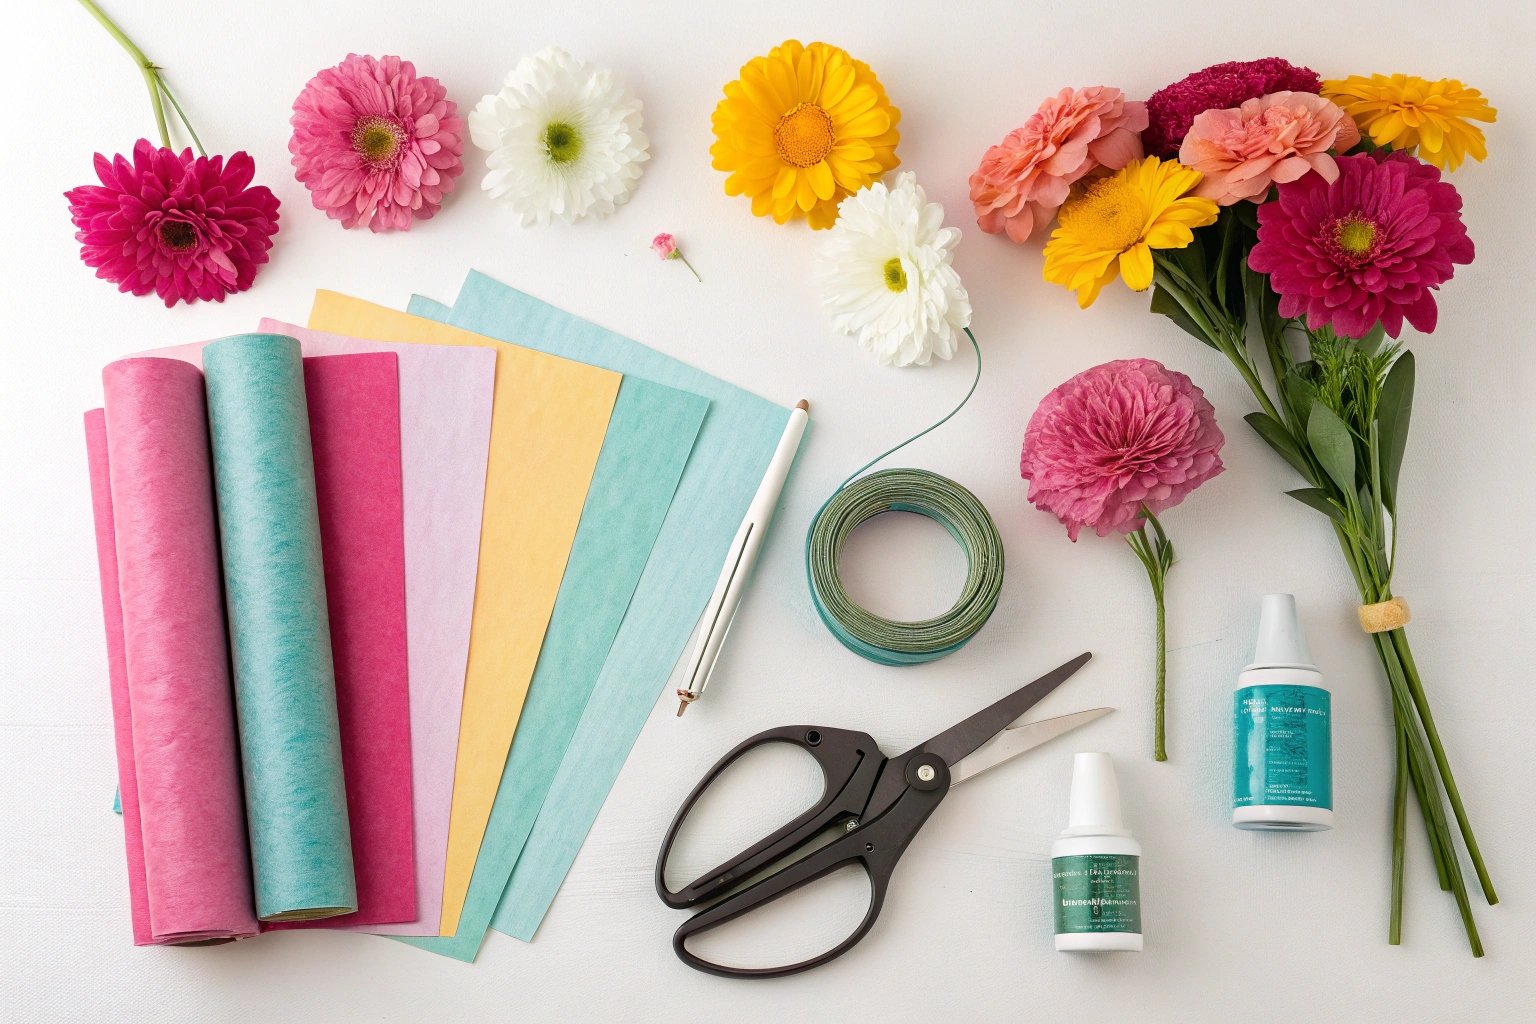
Excited to craft but don't know what you need? Gathering supplies can feel confusing, stopping the fun before it starts. Let's list everything required so you can start smoothly.
The essential materials are tissue paper (various colors!), sharp scissors, and floral wire or pipe cleaners for stems. You might also want floral tape for a neater finish.
Getting your materials together is the first step, and honestly, it's part of the fun! Choosing colors and textures sets the stage for your creation. Let's dive deeper into what works best.
Choosing Your Tissue Paper
The star of the show is, of course, the tissue paper.
Colors: Think about the final look you want. Do you want bright and cheerful? Soft pastels? Maybe realistic flower colors like reds, pinks, yellows, and whites? Don't forget green for leaves or stems! Having a variety gives you more options. I like to keep a good stock of different shades.
Quality: Not all tissue paper is created equal. Some are very thin and tear easily, which can be frustrating. Others are a bit thicker and more forgiving. For beginners, a slightly sturdier paper might be easier to work with. You don't need the most expensive kind, but avoid the super flimsy stuff if possible.
Size: Standard tissue paper sheets work well. You'll likely be cutting them down anyway, but starting with a decent size gives you flexibility.
Stem Options
You need something to hold your flower head and act as a stem for arranging.
Floral Wire: This is my preferred choice. It comes in different gauges (thicknesses). A medium gauge (like 20-24 gauge) is usually good – strong enough to hold the flower but flexible enough to work with. You can buy it pre-cut or on a paddle.
Pipe Cleaners: These are fuzzy and colorful, great especially if kids are involved. They are very easy to bend and twist. The fuzziness can help grip the paper. Green pipe cleaners look most like stems. They might be a bit bulkier than wire.
Essential Tools and Optional Extras
Beyond the paper and stems, a few tools make life easier.
Scissors: Sharp scissors are crucial! Dull scissors will chew up the delicate tissue paper. A medium-sized pair with a good point is ideal for cutting layers and shaping petals.
Ruler (Optional but helpful): If you want consistent flower sizes, a ruler helps measure and cut your tissue paper sheets accurately.
Floral Tape (Optional): This stretchy tape sticks to itself when pulled. It's great for wrapping around the base of the flower and down the wire stem, giving it a smoother, more realistic look and covering the sharp wire ends. Green is the most common color. I definitely recommend using it for a polished finish.
Glue (Optional): A small dab of craft glue can sometimes help secure layers or attach a center embellishment, but often it's not needed for basic flowers.
Pencil (Optional): Useful for lightly tracing shapes if you're cutting specific petal designs.
Here’s a quick table summarizing the basics:
Item
Essential/Optional
Notes
Tissue Paper
Essential
Various colors, decent quality
Scissors
Essential
Must be sharp!
Floral Wire OR Pipe Cleaners
Essential
For creating the stems
Floral Tape
Optional
Recommended for a finished look, covers wire
Ruler
Optional
Helps with consistent sizing
Glue
Optional
For extra security or embellishments
Gathering these items beforehand makes the whole process much more enjoyable. Trust me, searching for scissors mid-fold is no fun!
How do I make a basic tissue paper flower?
Got your supplies ready? Feeling unsure about the actual steps to turn flat paper into a flower? Don't worry, this basic method is super easy to follow, let's make one together!
Stack about 6-8 tissue paper sheets. Fold them like an accordion (back and forth). Secure the center tightly with floral wire. Trim the ends. Carefully pull up each layer.
This accordion or fan-fold method is the foundation for many tissue paper flowers, like carnations or peonies. It's simple but very effective. Let's walk through each step carefully. I remember the first time I tried this, I was amazed at how quickly a flower shape appeared!
Step 1: Layer and Fold
Prepare your paper: Cut your tissue paper into rectangles. A good starting size is around 8 inches by 10 inches (or 20cm x 25cm), but you can adjust this later to make different sized flowers. Stack about 6 to 8 sheets neatly on top of each other. Using multiple layers creates a fuller flower. You can use all the same color or mix colors here.
Accordion Fold: Starting at one of the shorter edges, make your first fold about 1 inch (2.5 cm) wide. Flip the stack over and fold it back the other way, again about 1 inch wide. Keep folding back and forth, like you're making a paper fan, until the entire stack is folded into a narrow strip. Try to keep the folds even. The width of your folds will influence the look of the petals – narrower folds make finer petals.
Step 2: Secure and Trim
Find the Center: Fold the accordion strip in half gently to find the exact middle point. Unfold slightly.
Secure with Wire/Pipe Cleaner: Take a piece of floral wire (about 12 inches or 30 cm long) or a pipe cleaner. Fold it in half over the center point of your folded tissue paper strip. Twist the wire or pipe cleaner tightly right against the paper to secure it. Make sure it's snug, but not so tight it rips the paper immediately. Leave the ends of the wire long – this will be your stem.
Trim the Ends: Now, you shape the petals. Using your sharp scissors, trim both ends of the folded paper strip.
Rounded Ends: Cut the corners into a curve. This creates softer, rounded petals, good for peonies or roses.
Pointed Ends: Cut the ends into a point (like a 'V' shape). This gives spikier petals, more like dahlias or chrysanthemums.
Fringed Ends: Make several small snips into the ends. This creates a fringed effect, nice for carnations.
Be creative here! The shape you cut directly impacts the flower's final appearance.
Step 3: Fluffing Your Flower
This is the magical part where the flower comes to life!
Fan Out: Gently fan out the folded sides of the tissue paper strip away from the wire center.
Separate Layers: Carefully start pulling up the top layer of tissue paper on one side, gently easing it towards the center wire. Be gentle to avoid tearing! Then pull up the next layer, and the next, until all layers on that side are separated.
Repeat on Other Side: Do the same process on the other side of the wire center, separating each layer carefully and fluffing it upwards.
Shape: Once all layers are separated, gently fluff and arrange them with your fingers until you have a nice, full flower shape. Don't be afraid to scrunch the base slightly to encourage the petals upwards.
If a layer tears a little, don't worry too much. In a full flower, small imperfections often get hidden. Just be patient, especially with the first few flowers you make.
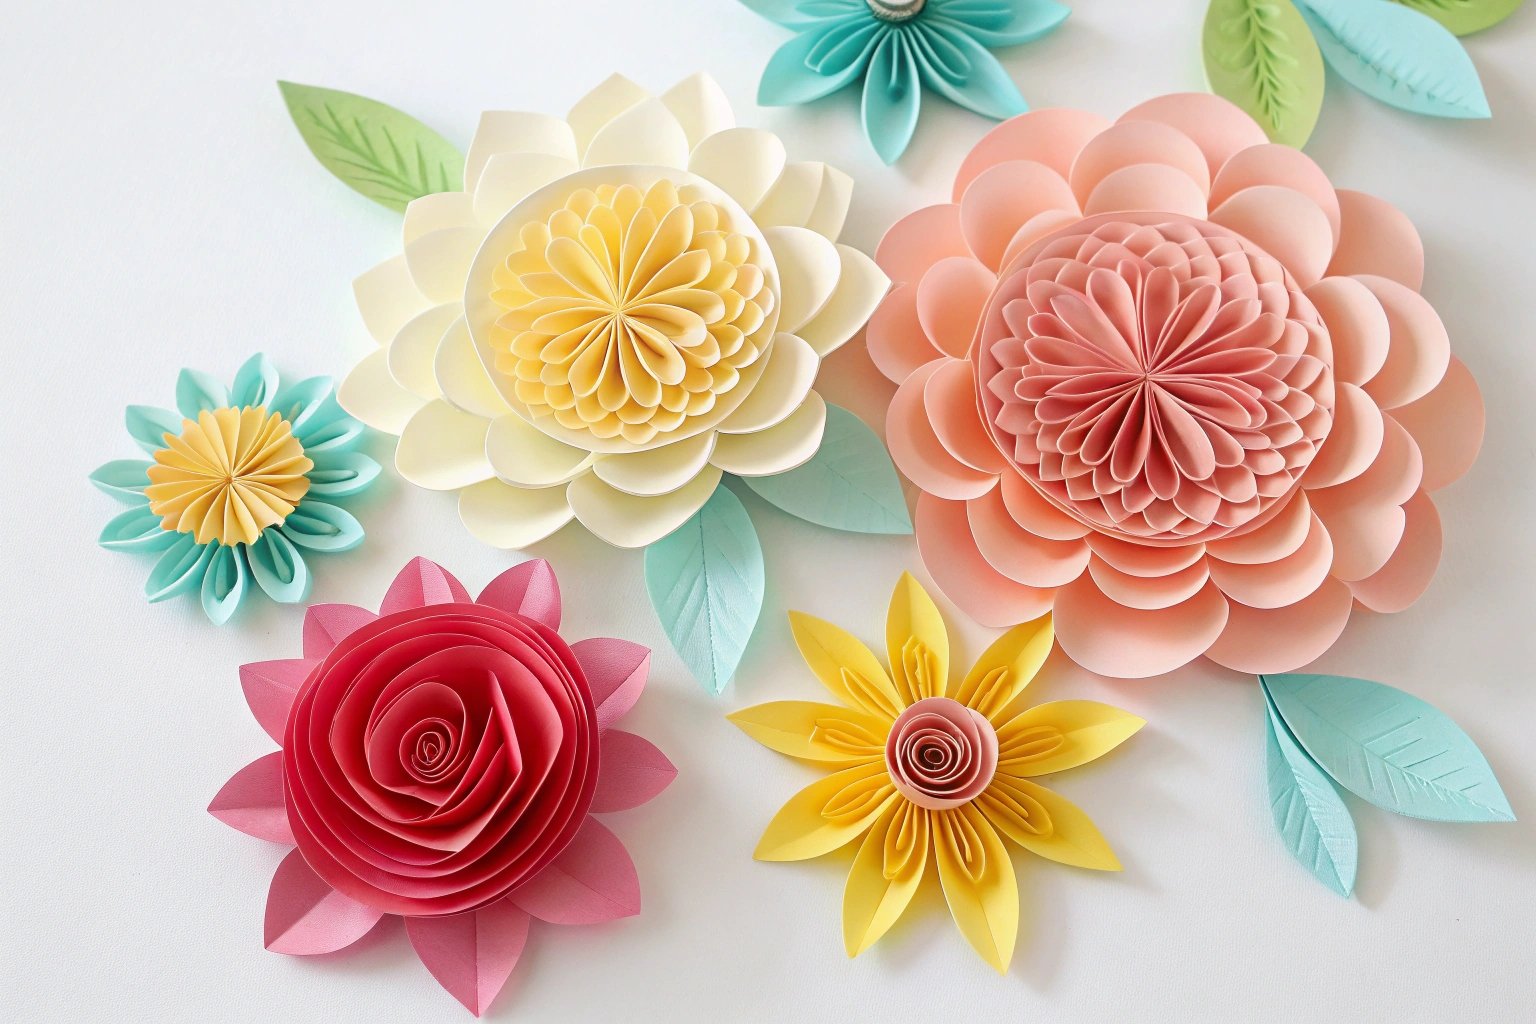
How can I make different types of paper flowers?
Made a few basic accordion-fold flowers? Want your bouquet to look more interesting and varied? Repeating the same style can be dull. Let's explore easy ways to create different looks.
You can easily vary your flowers. Try using fewer or more paper layers. Cut the ends differently – maybe scalloped or fringed. Mix colors within one flower for cool effects.
A bouquet looks much more natural and eye-catching when it includes flowers of different shapes, sizes, and even subtle color variations. Luckily, modifying the basic technique or trying slightly different approaches isn't complicated. It's all about experimenting. As someone who deals with floral aesthetics daily at The Floral Wrap, I appreciate how small changes create big impacts.
Playing with Petal Edges
We touched on this briefly, but the shape you cut on the ends of the accordion fold makes a huge difference.
Scalloped Edges: Instead of a simple curve, cut a series of smaller curves along the edge (like ~~~~). This gives a delicate, ruffled look.
Deep Fringe: Make longer, thinner cuts into the ends for a very textured, carnation-like appearance.
Wavy Edges: Cut a gentle wave instead of a straight or curved line.
Combination: You could even try making one edge rounded and the other pointed for an unusual effect.
Creative Color Combinations
Don't stick to single-color flowers unless that's the specific look you want.
Ombre Effect: Stack tissue paper sheets from dark to light (or vice-versa) before folding. When fluffed, this creates a beautiful gradient. For example, dark pink at the bottom layers, light pink in the middle, white on top.
Contrasting Center: Use 1-2 sheets of a different color (like yellow or black) just for the top layers. When you fluff, this becomes the flower's center.
Alternating Colors: Alternate sheets of two different colors in your stack for a striped or speckled effect.
Multi-Color Mix: Just randomly mix different colored sheets for a vibrant, confetti-like flower.
Size Matters: Miniatures and Giants
Simply changing the starting size of your tissue paper rectangle creates dramatically different results.
Miniatures: Use small squares or rectangles (e.g., 4x4 inches / 10x10 cm) and fewer layers (maybe 4-5). These are great for adding delicate accents to a bouquet or for other crafts.
Giants: Start with full sheets or even larger taped-together sheets! Use more layers (10-15+) for stability and fullness. These make fantastic statement pieces or party decorations. Remember to use stronger wire for the stems.
Varying Fullness and Shape
Fewer Layers: Using only 3-4 layers creates a more open, airy flower.
More Layers: Using 10+ layers results in a very dense, lush bloom.
Wider Folds: Making your accordion folds wider (e.g., 1.5-2 inches / 4-5 cm) results in larger, broader petals.
Cutting Petal Shapes (Alternative Method): For flowers like poppies or simple roses, you can cut out individual petal shapes (like hearts or teardrops), pinch or curl the bases slightly, and then layer and glue/tape them around a wire stem, starting from the center outwards. This takes more time but offers different shapes.
Experimentation is key. Try different combinations of these techniques. Sometimes the "mistakes" lead to the most interesting results!
How do I arrange the paper flowers into a bouquet?
Made lots of pretty paper flowers? Wondering how to make them look like a real bouquet now they have stems? Just holding them together might not work well. Let's arrange them nicely.
Start grouping your finished paper flowers. Hold the stems together. Vary the heights a little for a natural look. Wrap floral tape or a ribbon tightly around the stems to hold them.
You've put in the effort to make the individual blooms; arranging them well is the final step to showcasing your work. It’s not difficult, but a few simple tips can elevate your creation from a bunch of flowers to a proper bouquet. Think about balance, shape, and how the colors work together.
Building Your Bouquet Shape
Start with a Focus: Choose one or a few of your nicest flowers to be the center or focal point. Hold these in one hand.
Add Flowers Around: Begin adding other flowers around the central ones. Turn the bouquet in your hand as you add more stems. Try to distribute different flower types and sizes evenly.
Aim for a Shape: A simple rounded dome shape is usually the easiest and looks good. Imagine a gentle curve over the top. Avoid having all flowers at the exact same level, which can look flat.
Consider the Angle: Think about how the bouquet will be viewed. If it's going in a vase, it needs to look good from all sides. If it's a presentation bouquet, it might have more of a front focus.
Balancing Colors and Heights
Color Distribution: Don't clump all the red flowers together, then all the white ones. Mix them up naturally throughout the bouquet. Step back occasionally and look at the overall color balance.
Vary Heights: This is important! Pull some stems slightly higher and push others slightly lower. This creates depth and a more organic, less rigid appearance. Even a small difference in height between adjacent flowers makes a big impact. If stems are too long, you can trim them carefully with wire cutters before wrapping.
Adding Greenery (Optional): You can make simple leaves by folding green tissue paper and cutting leaf shapes, then taping them onto separate wires or directly onto some flower stems near the base. This adds realism and helps fill gaps.
Securing Your Stems
Once you are happy with the arrangement in your hand:
Find the Binding Point: Decide where you want the bouquet to be held together – usually a few inches below the lowest flower heads.
Use Floral Tape First (Recommended): Wrap floral tape tightly around all the stems at the binding point. Start at the top and wrap downwards for an inch or two. The tape stretches and sticks to itself, providing a secure base and covering sharp wire ends. This makes handling much easier.
Add Ribbon (Optional): For a decorative finish, tie a nice ribbon over the floral tape. You can make a simple knot or a bow. This covers the tape and adds a final touch of color or texture. Trim the ribbon ends neatly.
Hold the bouquet up and look at it from different angles. Adjust any flowers that seem out of place. Sometimes gently bending a wire stem can position a flower perfectly.
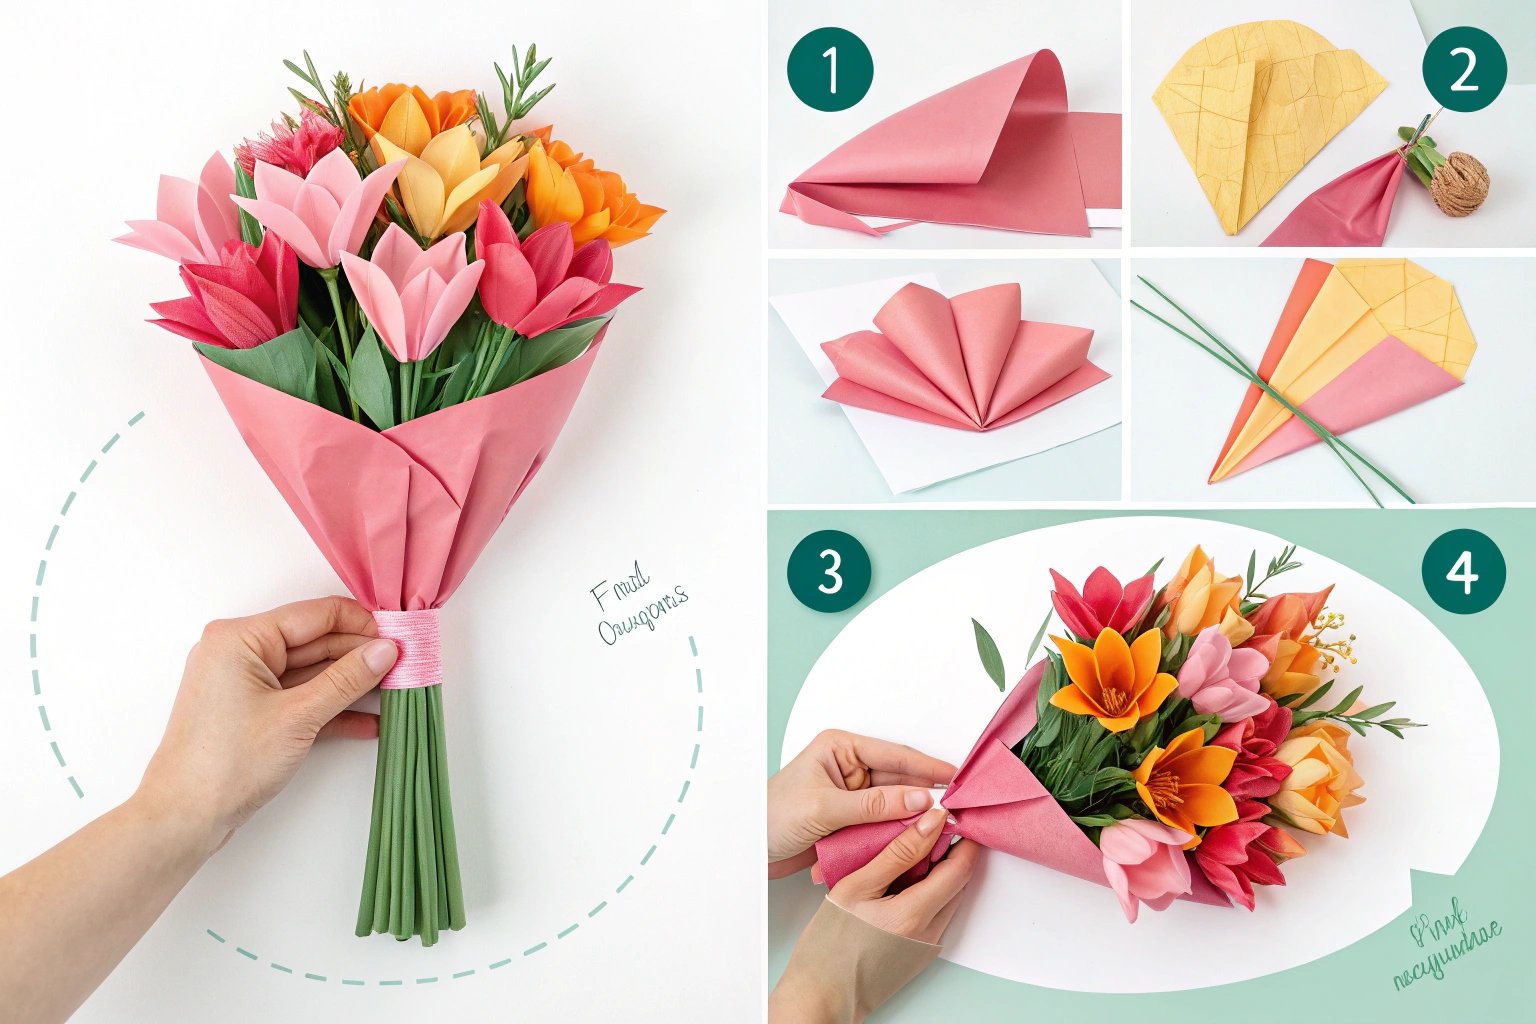
How can I wrap my paper flower bouquet beautifully?
Your paper bouquet is assembled and looks great! Want to give it that final polished look, maybe for gifting? A bare stem bundle feels incomplete. Let's talk about easy, beautiful wrapping.
Choose nice wrapping paper. Lay your bouquet diagonally on the paper. Fold the sides up loosely around the flowers. Tie it securely near the base with a ribbon or string.
Wrapping adds that professional touch and makes your handmade bouquet feel even more special. It also helps protect the stems and makes it easier to handle. As someone who runs The Floral Wrap, focusing on quality wrapping paper, I know firsthand how much difference the right presentation makes. It shows care and elevates the gift. You don't need complex florist skills; a simple wrap can be very effective.
Selecting the Right Wrapping Paper
The choice of paper impacts the final look significantly.
Kraft Paper: Brown or colored kraft paper gives a lovely rustic, natural feel. It's sturdy and complements handmade items well.
Patterned Paper: Choose a pattern that complements your flowers, not competes with them. Simple dots, stripes, or subtle florals work well.
Cellophane: Clear or tinted cellophane adds a glossy finish and allows the flowers inside to be seen. It can be used alone or layered over another paper.
Tissue Paper (again!): You can use contrasting or coordinating tissue paper as an inner layer for softness and color before adding an outer wrap.
Quality Matters: Just like with real flowers, flimsy paper can tear easily and look cheap. Choose something with a bit of body. At The Floral Wrap, we focus on papers that are both beautiful and durable enough for presentation.
Here's a quick comparison for this project:
Paper Type
Pros
Cons
Best For
Kraft Paper
Sturdy, rustic look, affordable
Can be plain if not embellished
Natural, handmade aesthetic
Patterned Paper
Adds visual interest, variety
Pattern might clash if too bold
Complementing flower colors
Cellophane
Shows flowers, glossy, water-resistant
Can be noisy, tears if snagged
Layering, modern look
Tissue Paper
Softness, color layering
Too flimsy as the only wrap
Inner layer, adding color
Simple Wrapping Techniques
Here's a common and easy method:
Cut Your Paper: Cut a large square or rectangle of your chosen wrapping paper. Bigger is usually better; you can always trim excess. A square around 24x24 inches (60x60 cm) is often a good start for an average bouquet.
Position the Bouquet: Lay the paper flat on a table. Place your bouquet diagonally across the paper, with the flower heads towards one corner and the stems towards the opposite corner. The binding point (where you taped/tied the stems) should be roughly in the center of the paper.
Fold the Bottom Corner: Bring the bottom corner of the paper (near the stems) up and over the stems, folding it neatly.
Fold the Sides: Bring one side of the paper across the bouquet. Then bring the other side across, overlapping the first side. Keep the folds slightly loose around the flower heads to avoid crushing them, but snug around the stems.
Secure: Gather the paper tightly around the binding point of the stems. Tie firmly with ribbon, twine, or raffia. You can make a simple knot or a decorative bow.
Adjust and Fluff: Gently adjust the paper folds around the flowers so they look nice. Trim any excessively long paper points if needed.
Finishing Touches
Ribbon Choice: Match the ribbon to the paper or the flowers. Satin, grosgrain, twine, or raffia all offer different looks.
Add a Tag: A small handmade tag with a message adds a personal touch if you're gifting the bouquet.
Consider Layering: Try placing the bouquet on a sheet of tissue paper first, then wrapping with kraft paper or cellophane over it for extra color and texture.
Wrapping is the frame for your artwork. Take a moment to do it neatly; it really completes the beautiful bouquet you've crafted.
Conclusion
Making tissue paper flower bouquets is a fun, creative, and rewarding craft accessible to everyone. Now you have the steps to create and beautifully present your own lasting blooms!